
ADVERTISEMENT
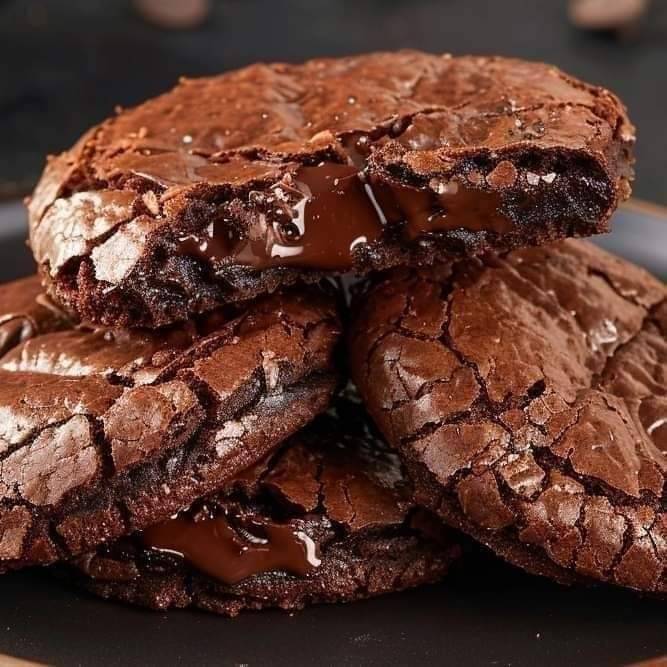
Gooey Chocolate Lava Cookies: The Ultimate Melt-in-Your-Mouth Dessert
For those who crave a truly indulgent dessert, Gooey Chocolate Lava Cookies are the perfect treat. These cookies combine the best of both worlds—crispy edges and a soft, gooey center bursting with rich, molten chocolate. Imagine the satisfaction of breaking open a warm cookie only to have velvety chocolate ooze out, creating a dessert experience that feels both luxurious and comforting.
Whether you’re planning a special dessert or simply want to elevate your cookie game, these chocolate lava cookies will become your new favorite go-to recipe.
Why You’ll Love Gooey Chocolate Lava Cookies
These cookies are a chocolate lover’s dream. The rich chocolate filling offers the same indulgence as a molten lava cake but in a more convenient, hand-held form. The recipe is surprisingly simple, and the results are irresistibly decadent, making it the perfect dessert for dinner parties, holidays, or a cozy night in. Plus, they’re customizable—you can change the flavor of the filling or add extra toppings to make them uniquely yours.
Ingredients
For the Cookie Dough:
- 1 cup (2 sticks) unsalted butter, softened
- ¾ cup granulated sugar
- ½ cup brown sugar, packed
- 2 large eggs
- 1 teaspoon vanilla extract
- 2 ¼ cups all-purpose flour
- ¾ cup unsweetened cocoa powder
- 1 teaspoon baking soda
- ½ teaspoon salt
For the Lava Filling:
- 1 cup semi-sweet or dark chocolate chips
- ½ cup heavy cream
Optional Toppings:
- Powdered sugar, ice cream, or whipped cream
For Complete Cooking STEPS Please Head On Over To Next Page Or Open button (>) and don’t forget to SHARE with your Facebook friends
Instructions
Step 1: Prepare the Chocolate Lava Filling
- Make the Ganache: Start by preparing the gooey center. In a microwave-safe bowl, combine the chocolate chips and heavy cream. Heat the mixture in the microwave for 30-second intervals, stirring after each interval until the chocolate is fully melted and smooth.
- Chill the Ganache: Transfer the melted chocolate mixture (ganache) to the refrigerator for about 30-45 minutes, or until it thickens enough to hold its shape. This will make it easier to form the lava centers for the cookies.
Step 2: Make the Cookie Dough
- Cream the Butter and Sugars: In a large bowl, beat the softened butter, granulated sugar, and brown sugar together until light and fluffy—about 2-3 minutes.
- Add Eggs and Vanilla: Beat in the eggs, one at a time, followed by the vanilla extract.
- Mix the Dry Ingredients: In a separate bowl, whisk together the flour, cocoa powder, baking soda, and salt. Gradually add the dry ingredients to the butter mixture, mixing just until combined. The dough will be thick and chocolatey.
- Chill the Dough: Cover the dough with plastic wrap and refrigerate for at least 30 minutes. This will make the dough easier to handle and help prevent the cookies from spreading too much.
Step 3: Assemble the Cookies
- Preheat the Oven: Preheat your oven to 350°F (175°C) and line a baking sheet with parchment paper.
- Form Cookie Dough Balls: Scoop about 2 tablespoons of cookie dough and flatten it slightly into a disk in your hands.
- Add the Lava Filling: Place a small spoonful of the chilled chocolate ganache in the center of the dough disk. Carefully wrap the dough around the ganache, making sure it’s fully enclosed.
- Seal and Shape: Roll the dough into a ball, making sure there are no gaps where the ganache could leak out during baking. Repeat this process with the remaining dough and ganache.
Step 4: Bake the Cookies
- Bake the Cookies: Place the filled cookie dough balls onto the prepared baking sheet, leaving about 2 inches of space between each cookie. Bake in the preheated oven for 10-12 minutes, or until the edges are set but the centers are still slightly soft.
- Cool Slightly: Allow the cookies to cool on the baking sheet for about 5 minutes before transferring them to a wire rack. They will firm up slightly as they cool, but the centers will remain molten.
Step 5: Serve and Enjoy
- Serve Warm: For the ultimate gooey chocolate experience, serve the cookies warm so the lava center oozes out when broken open. You can sprinkle them with powdered sugar or serve them alongside a scoop of vanilla ice cream for extra decadence.
- Store Leftovers: Store any leftover cookies in an airtight container at room temperature for up to 3 days. To reheat and enjoy that gooey center again, simply microwave the cookies for about 10-15 seconds.
Tips for Perfect Gooey Chocolate Lava Cookies
- Chill the Dough: Chilling the dough helps keep the cookies from spreading too much in the oven and ensures the centers stay gooey.
- Seal the Lava Filling Well: Make sure the chocolate ganache is completely enclosed in the cookie dough to prevent any leakage while baking.
- Use High-Quality Chocolate: Since the chocolate ganache is the star of this recipe, using high-quality chocolate chips or chopped chocolate will make a noticeable difference in flavor.
- Customize the Filling: You can switch up the filling by using white chocolate, caramel, or even peanut butter for a fun twist on the classic chocolate lava center.
Variations
- Nutella Lava Cookies: Swap out the chocolate ganache for Nutella to create a hazelnut-flavored lava center that pairs beautifully with the chocolate cookie dough.
- Salted Caramel Lava: For a sweet and salty combo, fill the cookies with salted caramel instead of chocolate ganache, and sprinkle a little sea salt on top before baking.
- Peanut Butter Chocolate Lava: Add a small dollop of peanut butter along with the chocolate ganache to create a peanut butter lava filling.
Conclusion
These Gooey Chocolate Lava Cookies are an irresistible, decadent dessert that will satisfy your deepest chocolate cravings. With their crispy edges and warm, molten centers, they offer a perfect balance of textures and flavors in every bite. Whether you’re serving them at a party, for a special occasion, or just treating yourself to a chocolatey indulgence, these cookies are sure to become a favorite!