
ADVERTISEMENT
Instructions
Step 1: Activate the Yeast
- In a small bowl, dissolve the yeast in the warm milk. Let it sit for 5-10 minutes until it becomes foamy. This is a sign that the yeast is active and ready to work its magic.
Step 2: Prepare the Dough
- In a large mixing bowl, whisk together the sugar, eggs, melted butter, and vanilla extract.
- Add the yeast mixture to the wet ingredients and stir to combine.
- Gradually add the flour and salt, mixing until a soft dough forms. Knead the dough for 5-7 minutes by hand or using a stand mixer with a dough hook attachment. The dough should be smooth, soft, and slightly tacky but not sticky.
Step 3: Let the Dough Rise
- Place the dough in a lightly greased bowl, cover it with a clean kitchen towel or plastic wrap, and let it rise in a warm place for 1-1.5 hours, or until it has doubled in size.
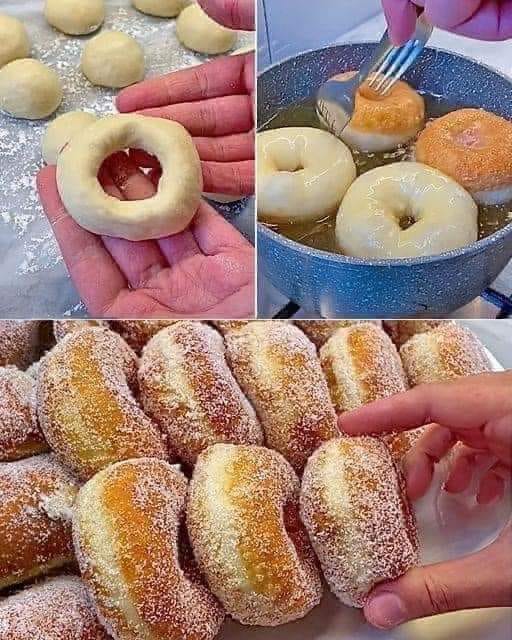
Step 4: Shape the Doughnuts
- Once the dough has risen, punch it down to release any air bubbles. Roll the dough out on a floured surface to about 1/2-inch thickness.
- Using a doughnut cutter (or a round cookie cutter for the doughnut and a smaller one for the hole), cut out as many doughnuts as possible. Re-roll the scraps and repeat until all the dough is used.
Step 5: Fry the Doughnuts
- Heat vegetable oil in a large pot or deep skillet to 350°F (175°C). Make sure the oil is deep enough to fully submerge the doughnuts.
- Carefully fry 2-3 doughnuts at a time, cooking them for about 1-2 minutes per side, or until golden brown. Be sure to fry the doughnut holes too—they’re delicious!
- Use a slotted spoon to transfer the doughnuts to a wire rack lined with paper towels to drain any excess oil.
Step 6: Glaze the Doughnuts
- While the doughnuts cool slightly, prepare the glaze by whisking together the powdered sugar, milk, and vanilla extract until smooth.
- Dip the warm doughnuts into the glaze, coating them evenly, and return them to the wire rack to set.
Customization Ideas
- Cinnamon-Sugar Coating: Instead of glazing, you can toss the doughnuts in a mixture of cinnamon and sugar while they’re still warm for a sweet, spiced coating.
- Chocolate Glaze: For a chocolate version, simply replace some of the powdered sugar with cocoa powder and add a tablespoon of melted butter to the glaze.
- Filled Doughnuts: Skip the doughnut hole and instead fill your fried doughnuts with jam, custard, or Nutella by injecting the filling with a piping bag.
Tips for Perfect Doughnuts
- Don’t Overheat the Oil: Keep an eye on your oil temperature. If it gets too hot, the outside will brown too quickly while the inside remains undercooked.
- Let the Dough Rise Fully: Patience is key when it comes to doughnuts. Letting the dough rise until it doubles in size ensures a light and fluffy texture.
- Use a Thermometer: To achieve perfectly cooked doughnuts, it’s a good idea to use a kitchen thermometer to monitor the oil temperature.
Serve and Enjoy!
Homemade doughnuts are best enjoyed fresh and warm, but you can store them in an airtight container for up to 2 days. To refresh them, pop them in the microwave for a few seconds to bring back that fresh-from-the-fryer feel.
A Sweet Treat for Any Occasion
These Homemade Doughnuts are perfect for a weekend baking project, a family get-together, or just when you’re craving a special treat. With their soft, fluffy texture and customizable toppings, they’re bound to become a favorite in your household. Whether you keep them simple with a classic glaze or go all out with fillings and toppings, these doughnuts will disappear in no time!
Let me know if you’d like to make any adjustments!